Week 1: Webcam Scavanger Hunt Game
2020/9/9
This is my maiden voyage into machine learning. I made a webcam scavanger hunt game based on the demo example. Players are supposed to find certain objects nearby according to the given instructions. When MobileNet reconizes a certain object, the video will change its color, and a thumbs-up emoji with a "You found it!" message will appear. Try it out here!
- Demo Video -

Week 2: Blow the DaNdelion
2020/9/16
This week I learned how to build my own image classification model with KNN Image Classifier. To create a "teachable machine"-style image classifier, first I need to collect data for my KNN model. When I collect new images for a class, I'll feed them through MobileNet to get the logits ("semantic fingerprint") of each image. Then I will put all the logits in my KNN model and label them as a specific class. After collecting training images for each of the classes, I can now use the model to make a prediction. I'll feed my input through MobileNet to get the logits vector, and calculate similarity between all dataset examples and the new vector. Using the k-nearest neighbor technique, I can then find the most similar k examples to the input. The class with the highest representation in that set is the most similar class for my input image.
For this week's assignment, I made an interactive game called "Blow the Dadelion!" First, I used Teachable Machine to build an image classification model that could recognize if I was blowing or not. Then I imported the model into my p5 sketch to classify my webcam video, and used the results to trigger the movement of dandelion seeds. When I blow in front of the webcam, the dandelion seeds will float into the air.
- Demo Video -

Week 3: Dance with bubbles
2020/9/23
PoseNet is super cool! It is a machine learning model that can be used to estimate the pose of a person in an image or video by estimating where key body joints are. Anyone with a webcam-equipped desktop or phone can experience this technology right from within a web browser.
Basically, the PoseNet model takes an image or video as input, and as outputs, it gives the xy coordinates of the 17 key body points and a confidencce score for each one. It also calculates the overall confidence in the estimation of a pose. For this week's assignment, I created colorful, wandering bubbles and made them follow the left and right wrist of a person. When I move my arms around and dance, the bubbles will dance with me. It's really fun!
- Demo Video -

Week 4: Falling bubbles
2020/9/30
Still playing with bubbles this week, but with a different machine learning model called Face-Api. Face-Api can be used for face detection, face recognition and face landmark detection. For a given face image, it returns the bounding box and the 68 point face landmarks of each face.
As a continuation of "Dance With Bubbles", this week I created bubbles that fall from the top of the screen, and bounce off of each other when they reach a person's head. I used matter.js libarary to create bubbles, and made the bounding box of a person's face the "ground" for bubbles. The idea was simple, but using face-api.js in combination with matter.js was quite challenging for me. Anyway, after a long time of coding and dubugging, I made it work! Hooray!
- Demo Video -

Week 5: BOOM
2020/10/7
An addition to my “Bubble World” series. This time I trained a sound classification model with Teachable Machine to recognize the word "boom" and integrated it with my previous "Dance with Bubbles" sketch. When I raise my hands and say the word "boom", bubbles will appear in my hands like magic.
- Demo Video -

Week 6: Style transfer Mirror
2020/10/14
This week I trained my own style transfer model by running this Google Colab. Unlike the training processes I went through before, this one took me nearly 4 hours. Once I finished training, I put the model into my p5 sketch and created a style transfer mirror. Since the source image was a landscape painting from Seurat, the style tranfer results for landscapes were fine, but the results for human faces weren’t that good.


Week 7: bodypix + spadecoco
2020/10/21
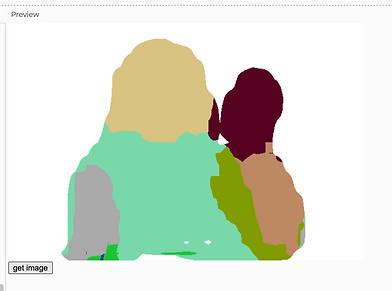
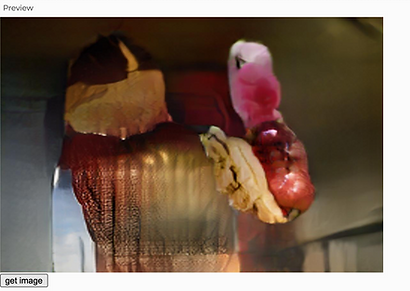
RunwayML is a platform for publishing and creating with pre-trained, open source machine learning models. There are many types of machine learning models, among which SPADE-COCO is my favorite. It can generate realistic images from segmentation maps. Since another machine learning model Bodypix can segment body parts, I combined the two models two see what they could produce. The result was kind of creepy:
Week 8: Chinese Character Generator
2020/10/28
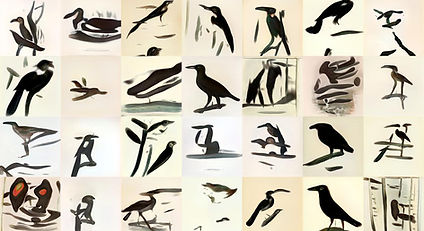
This week I trained a Chinese Character generation model with RunwayML. Since a Chinese character is actually a set of strokes/components combined together, I was curious whether a generative model can learn to identify different strokes and synthesize new chracters. I created a dataset of 200 Chinese character images and then chose the pre-trained model of bird illustrations as the base model. Next, I set the training step to 2000 and started training.
The visual outcomes midway through the training process really surprised me. Around 300-400 steps, birds from the pre-trained model was combined with the chracters, which created a cool Chinese ink painting effect. Around 600-700 steps, birds started to convert into characters, which reminded me of how ancient Chinece people created pictographs based on the everyday objects they saw.
- Output -
- Input -

source images

pre-trained model
360 steps

700 steps

output images
Week 14: Final Project - MUSIC rings
2020/12/7
The Music Rings is an interactive installation that enables players to play music with their hand movements.
Ideation
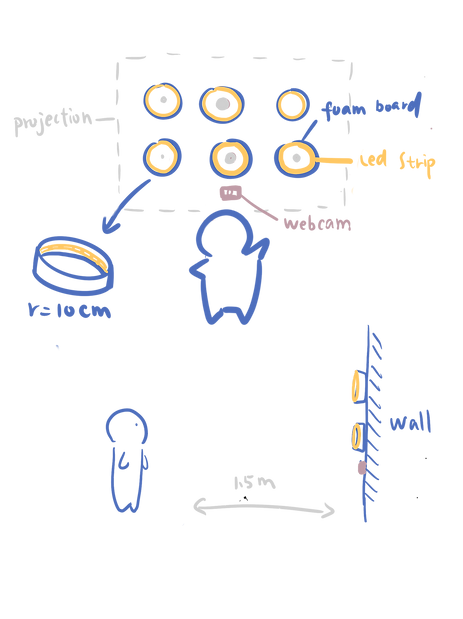
The installation consists of 6 rings, each of which is made up of a 70cm long LED strip and a piece of foam board. All the rings are stuck on a wall and controlled by Arduino. A p5 sketch is projected on the wall and mapped to the rings. A webcam is placed below the rings to track the player's hand positions.
When the performer's hand position moves inside a ring, the LED strip will light up and a music clip will be played. When the performer's hand moves out from the ring and then goes inside again, the LED strip will turn off and the music will stop.
Coding & Testing
In the p5 sketch, I created 6 circles to represent the music rings. Each circle is associated with a specific music audio file (bass, mallet, etc). Inside each circle there's also a solid colored circle which acts as the music visualizer. Its size is related to the audio's amplitude. I used the machine learning model PoseNet to detect hand positions and used two white solid circles to indicate where the user’s hands are located. When the user's hand moves inside a ring, p5 will play the associated music clip and send a start signal to Arduino to turn on a LED strip. When the user's hand moves out form the ring and comes back again, p5 will stop the music clip and send a stop signal to Arduino to turn off the LED strip. On the Arduino side, I used the FastLED library to control the 5-volt WS2812 LED strips. When a music clip is playing, the corresponding LED strip will show a running light effet with a fading trail. Here's the demo video:


Fabrication
For each LED strip, I extend its wires, stuck it on a strip of foam board, and glued the two ends togeter to make a ring. Then I projected my p5 sketch on the wall and stuck the rings according to the positions of the projected circles.
The 6 LED strips are in parallel in the circuit and I used a 5V/6A adaptor to power them.


Final Product

